pgpool+pg流复制实现双机热备
一 概述
自从postgreSQL9.0之后提供了Hot Standby流复制,备库在应用WAL record的同时也能够提供只读服务,大大提升了用户体验。主从流复制配合pgpool可以提升整个集群的吞吐,同时可以实现HA的功能。
现在网上可见的文档坑都比较多,这里做一个整体的实践,把坑填平。
二 实践环境和目标
1 实践环境
实践环境由2台虚拟机组成,两台机器已经配置安装完成pg的1主1从的流复制;pgpool的HA也在这两台机器部署,如果有独立的两台机器部署pgpool更好。
主结点 –> 主机名:pgyang1 ip:10.10.40.99
从结点 –> 主机名:pgyang2 ip:10.10.40.100
浮动ip : 10.10.40.101
为了操作简单,我把两台机器的防火墙和selinux都关掉了。
2 软件版本:
os –> CentOS x86_64 7.4.1708
postgresql –> 10.6
pgpool –> 3.6.14
3 两台机器的/etc/hosts文件内容
[root@pgyang1 yang]# cat /etc/hosts
127.0.0.1   localhost localhost.localdomain localhost4 localhost4.localdomain4
::1         localhost localhost.localdomain localhost6 localhost6.localdomain6
10.10.40.99   pgyang1
10.10.40.100  pgyang2
10.10.40.101  vip

[root@pgyang2 ~]# cat /etc/hosts
127.0.0.1   localhost localhost.localdomain localhost4 localhost4.localdomain4
::1         localhost localhost.localdomain localhost6 localhost6.localdomain6
10.10.40.99   pgyang1
10.10.40.100  pgyang2
10.10.40.101  vip
4 目标
实现如下的pgpool双机集群架构
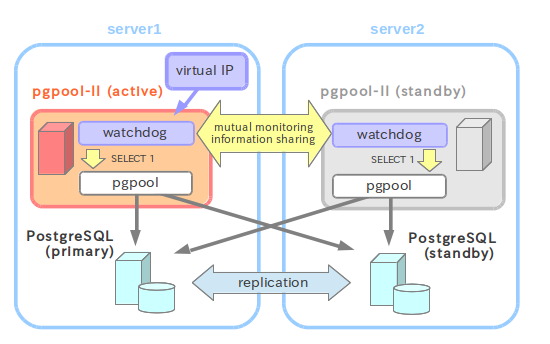
文字描述如下:
a.任意一结点上的pgpool宕掉后,浮动ip自动切到另一个结点,pgpool自动为用户提供服务,不需要人为干预;
b.postgresql的主库宕掉后,从库自动变为主库,不需要人为干预;
c.任何一个虚拟机停掉后,集群自动切换,不需要人为干预;
d.当从库promote成主库后,原来的主库变成从的过程稍复杂,考虑数据库和数据的安全性,需要人为手动操作。
三 集群搭建
本文假定你1主1从的流复制环境已经建完。
1 两台机器的postgres用户做ssh互信任
咋做在网上搜一下,最终要实现如下效果:
[postgres@pgyang1 ~]$ ssh pgyang2
Last login: Tue Jan 29 22:49:57 2019 from 10.10.10.66
[postgres@pgyang2 ~]$

[postgres@pgyang2 ~]$ ssh pgyang1
Last login: Tue Jan 29 22:42:29 2019 from 10.10.10.66
[postgres@pgyang1 ~]$
即两台机器postgres用户相互ssh对方不需要输入口令。
2 源码安装pgpool
两台机器都要做,如下以pgyang1做例子
下载网址:http://www.pgpool.net

# 解压
[root@pgyang1 yang]##tar -zxvf pgpool-II-3.6.14.tar.gz
# 文件权限设置为postgres(其实并非一定装在postgres账户,只不过之前ssh设置都在postgres下,为了方便)
[root@pgyang1 yang]$  cd pgpool-II-3.6.14
[root@pgyang1 pgpool-II-3.6.14]#  ./configure --prefix=/usr/local/pgpool-3.6.14 --with-pgsql=/usr/local/pgsql
[root@pgyang1 pgpool-II-3.6.14]#  make
[root@pgyang1 pgpool-II-3.6.14]#  make install

[root@pgyang1 pgpool-II-3.6.14]# cd /usr/local
[root@pgyang1 local]# chown -R postgres.postgres /usr/local/pgpool-3.6.14
[root@pgyang1 local]# ln -sf /usr/local/pgpool-3.6.14 /usr/local/pgpool

把/usr/local/pgpool/bin 添加到postgres用户的PATH环境变量里。
安装pgpool_adm,pg_reclass,pg_recovery;创建insert_lock字典表
[postgres@pgyang1 yang]cd pgpool-II-3.6.14/src/sql

[postgres@pgyang1 sql]$ cd pgpool_adm/
[postgres@pgyang1 pgpool_adm]$ make
[postgres@pgyang1 pgpool_adm]$ make install

[postgres@pgyang1 pgpool_adm]$ cd ..
[postgres@pgyang1 sql]$ cd pgpool-recovery/
[postgres@pgyang1 pgpool-recovery]$ make
[postgres@pgyang1 pgpool-recovery]$ make install

[postgres@pgyang1 pgpool-recovery]$ cd ..
[postgres@pgyang1 sql]$ cd pgpool-regclass/
[postgres@pgyang1 pgpool-regclass]$ make
[postgres@pgyang1 pgpool-regclass]$ make install

[postgres@pgyang1 pgpool-regclass]$ cd ..
[postgres@pgyang1 sql]$ psql -f insert_lock.sql
pgpool安装全部结束。
3 配置pgpool集群
pgyang1/2节点都执行。
1)配置pool_hba.conf
要与pg_hba.conf保持一致
2)配置pcp.conf
pcp.conf配置用于pgpool自己登陆管理使用的,一些操作pgpool的工具会要求提供密码等,配置如下:
[postgres@pgyang1 ~]$ cd /opt/pgpool/etc
[postgres@etc~]$ cp pcp.conf.sample pcp.conf
# 使用pg_md5生成配置的用户名密码
[postgres@etc~]$ pg_md5 <postgres的口令>
5b2b49e58f0700c8576236d6c396fc2a

#pcp.conf是pgpool管理器自己的用户名和密码,用于管理集群。
[postgres@etc~]$ vim pcp.conf
#编辑内容如下
postgres:5b2b49e58f0700c8576236d6c396fc2a

#保存退出!
3)创建pool_passwd文件
[postgres@etc~]$ pg_md5 -p -m -u postgres pool_passwd
#数据库登录用户是postgres,这里输入登录密码,不能出错
#输入密码后,在pgpool/etc目录下会生成一个pool_passwd文件
4)配置系统命令权限
配置 ifconfig, arping 执行权限,执行failover_stream.sh需要用到,可以让其他普通用户执行。
[root@pgyang1 ~]# chmod u+s /sbin/ifconfig
[root@pgyang1 ~]# chmod u+s /usr/sbin
5) 配置pgpool.conf
用ifconfig命令看一下网卡设备的名称,我这设备名字为:ens192
配置pgyang1上的pgpool.conf:
[postgres@pgyang1 ~]$ cd /usr/local/pgpool/etc
[postgres@etc~]$ cp pgpool.conf.sample pgpool.conf
[postgres@etc~]$ vim pgpool.conf
编辑内容如下:
# CONNECTIONS
listen_addresses = '*'
port = 9999
pcp_listen_addresses = '*'
pcp_port = 9898

# - Backend Connection Settings -

backend_hostname0 = 'pgyang1'
backend_port0 = 5432
backend_weight0 = 1
backend_data_directory0 = '/pgdata/10.6'
backend_flag0 = 'ALLOW_TO_FAILOVER'

backend_hostname1 = 'pgyang2'
backend_port1 = 5432
backend_weight1 = 1
backend_data_directory1 = '/pgdata/10.6'
backend_flag1 = 'ALLOW_TO_FAILOVER'

# - Authentication -
enable_pool_hba = on
pool_passwd = 'pool_passwd'

# FILE LOCATIONS
pid_file_name = '/usr/local/pgpool/pgpool.pid'

replication_mode = off
load_balance_mode = on
master_slave_mode = on
master_slave_sub_mode = 'stream'

sr_check_period = 5
sr_check_user = 'replica'
sr_check_password = 'replica'
sr_check_database = 'postgres'

#------------------------------------------------------------------------------
# HEALTH CHECK,必须设置,不然primary数据库down了,pgpool不知道
#------------------------------------------------------------------------------

health_check_period = 10
health_check_timeout = 20
health_check_user = 'replica'
health_check_password = 'replica'  #Password for health check user
health_check_database = 'postgres'

#------------------------------------------------------------------------------
# FAILOVER AND FAILBACK,主备切换命令
#------------------------------------------------------------------------------

failover_command = '/usr/local/pgpool/failover_stream.sh %d %H '

#------------------------------------------------------------------------------
# WATCHDOG,浮动ip,两个结点pgpool HA
#------------------------------------------------------------------------------

# - Enabling -
use_watchdog = on
# - Watchdog communication Settings -

wd_hostname = 'pgyang1'
wd_port = 9000

# - Virtual IP control Setting -
delegate_IP = 'vip'
if_cmd_path = '/sbin'
if_up_cmd = 'ifconfig ens192:0 inet $_IP_$ netmask 255.255.255.0'
                                    # ens192根据实际修改
if_down_cmd = 'ifconfig ens192:0 down'

# -- heartbeat mode --

wd_heartbeat_port = 9694
wd_heartbeat_keepalive = 2
wd_heartbeat_deadtime = 30
heartbeat_destination0 = 'pgyang2'
heartbeat_destination_port0 = 9694
heartbeat_device0 = 'ens192'

# - Other pgpool Connection Settings -

other_pgpool_hostname0 = 'pgyang2'  #对端
other_pgpool_port0 = 9999
other_wd_port0 = 9000
这里用到的replica用户需要提前在pg库里建上,我这里为了省事直接使用了pg主从用于复制的用户replica。
配置pgyang2上的pgpool.conf:
# CONNECTIONS
listen_addresses = '*'
port = 9999
pcp_listen_addresses = '*'
pcp_port = 9898

# - Backend Connection Settings -

backend_hostname0 = 'pgyang1'
backend_port0 = 5432
backend_weight0 = 1
backend_data_directory0 = '/pgdata/10.6'
backend_flag0 = 'ALLOW_TO_FAILOVER'

backend_hostname1 = 'pgyang2'
backend_port1 = 5432
backend_weight1 = 1
backend_data_directory1 = '/pgdata/10.6'
backend_flag1 = 'ALLOW_TO_FAILOVER'

# - Authentication -
enable_pool_hba = on
pool_passwd = 'pool_passwd'

# FILE LOCATIONS
pid_file_name = '/usr/local/pgpool/pgpool.pid'

replication_mode = off
load_balance_mode = on
master_slave_mode = on
master_slave_sub_mode = 'stream'

sr_check_period = 5
sr_check_user = 'replica'
sr_check_password = 'replica'
sr_check_database = 'postgres'

#------------------------------------------------------------------------------
# HEALTH CHECK,必须设置,不然primary数据库down了,pgpool不知道
#------------------------------------------------------------------------------

health_check_period = 10
health_check_timeout = 20
health_check_user = 'replica'
health_check_password = 'replica'  #Password for health check user
health_check_database = 'postgres'

#------------------------------------------------------------------------------
# FAILOVER AND FAILBACK,主备切换命令
#------------------------------------------------------------------------------

failover_command = '/usr/local/pgpool/failover_stream.sh %d %H '

#------------------------------------------------------------------------------
# WATCHDOG,浮动ip,两个结点pgpool HA
#------------------------------------------------------------------------------

# - Enabling -
use_watchdog = on
# - Watchdog communication Settings -

wd_hostname = 'pgyang2'
wd_port = 9000

# - Virtual IP control Setting -
delegate_IP = 'vip'
if_cmd_path = '/sbin'
if_up_cmd = 'ifconfig ens192:0 inet $_IP_$ netmask 255.255.255.0'
                                    # ens192根据实际修改
if_down_cmd = 'ifconfig ens192:0 down'

# -- heartbeat mode --

wd_heartbeat_port = 9694
wd_heartbeat_keepalive = 2
wd_heartbeat_deadtime = 30
heartbeat_destination0 = 'pgyang1'
heartbeat_destination_port0 = 9694
heartbeat_device0 = 'ens192'

# - Other pgpool Connection Settings -

other_pgpool_hostname0 = 'pgyang1'  #对端
other_pgpool_port0 = 9999
other_wd_port0 = 9000
failover_stream.sh脚本:
未用trigger_file的方式,切来切去特别容易弄乱了。
[postgres@pgyang1 pgpool]$ cat failover_stream.sh
#! /bin/sh
# Failover command for streaming replication.
# This script assumes that DB node 0 is primary, and 1 is standby.
#
# If standby goes down, do nothing. If primary goes down, create a
# trigger file so that standby takes over primary node.
#

# Arguments: $1: failed node id. $2: new master hostname. $3:  trigger_command

failed_node=$1
new_master=$2
trigger_command="$PGHOME/bin/pg_ctl promote -D $PGDATA"

#Do nothing if standby goes down.
#if [ $failed_node = 1 ]; then
#        exit 0;
#fi

# Prompte standby database.
/usr/bin/ssh -T $new_master $trigger_command

exit 0;
四 PGPool集群管理
1 启动pgpool集群之前在pgyang1/2节点创建用到的目录:
以pgyang1示例:
[root@pgyang1 ~]# mkdir /var/log/pgpool
[root@pgyang1 ~]# chown -R postgres:postgres /var/log/pgpool
[root@pgyang1 ~]# mkdir /var/run/pgpool
[root@pgyang1 ~]# chown -R postgres:postgres /var/run/pgpool
2 启动集群
两个结点都要
#pgyang1上操作
[postgres@pgyang1 ~]$ pgpool -n -d -D > /var/log/pgpool/pgpool.log 2>&1 &

#pgyang2上操作
[postgres@pgyang2 ~]$ pgpool -n -d -D > /var/log/pgpool/pgpool.log 2>&1 &
3 启动pgpool后,查看集群节点状态
注意一下pyang,这是一个alias,后面测试经常用到。
[postgres@pgyang1 pgpool]$ alias|grep -i pyang
alias pyang='psql -h vip -p 9999 -U postgres -d postgres'
[postgres@pgyang1 pgpool]$
[postgres@pgyang1 pgpool]$ pyang
Password for user postgres:
psql (10.6)
Type "help" for help.

postgres=# show pool_nodes;
 node_id | hostname | port | status | lb_weight |  role   | select_cnt | load_balance_node | replication_delay
---------+----------+------+--------+-----------+---------+------------+-------------------+-------------------
 0       | pgyang1  | 5432 | up     | 0.500000  | primary | 0          | false             | 0
 1       | pgyang2  | 5432 | up     | 0.500000  | standby | 0          | true              | 0
(2 rows)

postgres=#
都是up的状态。
五 HA测试
1 模拟master端pgpool宕机
在pgyang1节点上停止pgpool服务
[postgres@pgyang1 ~]$ pgpool -m fast stop

#等几秒
[postgres@pgyang1 ~]$ pyang

postgres=# show pool_nodes;
 node_id | hostname | port | status | lb_weight |  role   | select_cnt | load_balance_node | replication_delay
---------+----------+------+--------+-----------+---------+------------+-------------------+-------------------
 0       | pgyang1  | 5432 | up     | 0.500000  | primary | 0             | false  | 0
 1       | pgyang2  | 5432 | up     | 0.500000  | standby | 0             |  true  | 0
(2 rows)

#pgyang1节点上的pgpool宕机后,pgyang2节点的pgpool接管vip和集群服务
#pgyang2上的pgpool宕机后效果也一样。
2 模拟pg主库宕库
[postgres@pgyang1 ~]$ pg_ctl stop
pgyang1 pg库日志:
2019-01-29 08:10:17.492 CST,,,80799,,5c4e7bd3.13b9f,3,,2019-01-28 11:49:39 CST,,0,LOG,00000,"received fast shutdown request",,,,,,,,,""
2019-01-29 08:10:17.493 CST,,,80799,,5c4e7bd3.13b9f,4,,2019-01-28 11:49:39 CST,,0,LOG,00000,"aborting any active transactions",,,,,,,,,""
2019-01-29 08:10:17.493 CST,"postgres","qiuyb",29112,"10.10.40.99:58234",5c4f9918.71b8,1,"idle",2019-01-29 08:06:48 CST,4/0,0,FATAL,57P01,"terminating connection due to administrator command",,,,,,,,,"Navicat"
2019-01-29 08:10:17.493 CST,"postgres","qiuyb",29115,"10.10.40.99:58246",5c4f9921.71bb,1,"idle",2019-01-29 08:06:57 CST,5/0,0,FATAL,57P01,"terminating connection due to administrator command",,,,,,,,,"Navicat"
2019-01-29 08:10:17.494 CST,,,80799,,5c4e7bd3.13b9f,5,,2019-01-28 11:49:39 CST,,0,LOG,00000,"worker process: logical replication launcher (PID 80808) exited with exit code 1",,,,,,,,,""
2019-01-29 08:10:17.498 CST,,,80802,,5c4e7bd3.13ba2,1,,2019-01-28 11:49:39 CST,,0,LOG,00000,"shutting down",,,,,,,,,""
2019-01-29 08:10:17.641 CST,"replica","",80918,"10.10.40.100:51646",5c4e7c27.13c16,1,"streaming 0/5582000",2019-01-28 11:51:03 CST,3/0,0,LOG,08006,"could not send data to client: Connection reset by peer",,,,,,,,,"walreceiver"
2019-01-29 08:10:17.784 CST,,,80799,,5c4e7bd3.13b9f,6,,2019-01-28 11:49:39 CST,,0,LOG,00000,"database system is shut down",,,,,,,,,""

pgyang2 pg库日志
2017-07-24 18:52:41.455 PDT [2614] LOG:  invalid record length at 0/2A000098: wanted 24, got 0
2017-07-24 18:52:47.333 PDT [2614] LOG:  received promote request
2017-07-24 18:52:47.333 PDT [2614] LOG:  redo done at 0/2A000028
2017-07-24 18:52:47.333 PDT [2614] LOG:  last completed transaction was at log time 2017-07-24 18:17:00.946759-07
2017-07-24 18:52:47.336 PDT [2614] LOG:  selected new timeline ID: 10
2017-07-24 18:52:47.841 PDT [2614] LOG:  archive recovery complete
2017-07-24 18:52:47.851 PDT [2613] LOG:  database system is ready to accept connections

#日志清楚看到主机down机了,数据库切换了。
#稍等片刻后,访问集群
[postgres@pgyang1 ~]$ pyang
Password:

postgres=# show pool_nodes;
 node_id | hostname | port | status | lb_weight |  role   | select_cnt | load_balance_node | replication_delay
---------+----------+------+--------+-----------+---------+------------+-------------------+-------------------
 0       | pgyang1  | 5432 | down   | 0.500000  | standby | 0          | false             | 0
 1       | pgyang2  | 5432 | up     | 0.500000  | primary | 0          | true              | 0
(2 rows)
#pgyang2已经被切换成primary,且pgyang1节点状态是down
修复pgyang1节点重新加入集群
有两种方式:
方式1是以pg_basebackup的方式,以pgyang2为主库,在pgyang1是建立从库。
pg_basebackup -D $PGDATA -Fp -Xs -v -P -h pgyang2 -U replica
vi一下recovery.conf,启动一下就可以了,并查看一下日志,做相应的操作。
方式2是pg_rewind方式,具体操作见下一节。
3 pg主库主机直接down机实验
实验目标:
主结点pgyang1关机重启后,pgyang2结点的pgpool自动接管连接,浮动ip飘到pgyang2结点,pgyang2的pg从库自动promote成主库,并完成pgyang1上原来的主库的修复使其重新加入pg的集群并成为新的从库。
1)看一下当前集群状态
[postgres@pgyang1 ~]$ pyang
Password for user postgres:
psql (10.6)
Type "help" for help.

postgres=# show pool_nodes;
 node_id | hostname | port | status | lb_weight |  role   | select_cnt | load_balance_node | replication_delay
---------+----------+------+--------+-----------+---------+------------+-------------------+-------------------
 0       | pgyang1  | 5432 | up     | 0.500000  | primary | 0          | false             | 0
 1       | pgyang2  | 5432 | up     | 0.500000  | standby | 0          | true              | 0
(2 rows)

postgres=#

看一下当前timeline:
[postgres@pgyang1 pg_wal]$ pg_controldata|grep -i TimeLineID
Latest checkpoint's TimeLineID:       3
Latest checkpoint's PrevTimeLineID:   3

看一下vip,其现在pgyang1结点:
[root@pgyang1 etc]# ifconfig
ens192: flags=4163<UP,BROADCAST,RUNNING,MULTICAST>  mtu 1500
        inet 10.10.40.99  netmask 255.255.255.0  broadcast 10.10.40.255
        inet6 fe80::250:56ff:fea4:4edd  prefixlen 64  scopeid 0x20<link>
        ether 00:50:56:a4:4e:dd  txqueuelen 1000  (Ethernet)
        RX packets 1424517  bytes 810979421 (773.4 MiB)
        RX errors 0  dropped 363  overruns 0  frame 0
        TX packets 954506  bytes 647624689 (617.6 MiB)
        TX errors 0  dropped 0 overruns 0  carrier 0  collisions 0

ens192:0: flags=4163<UP,BROADCAST,RUNNING,MULTICAST>  mtu 1500
        inet 10.10.40.101  netmask 255.255.255.0  broadcast 10.10.40.255
        ether 00:50:56:a4:4e:dd  txqueuelen 1000  (Ethernet)
2) 从pgyang1关机重启
[root@pgyang1 etc]# shutdown -Fr 0
Shutdown scheduled for Wed 2019-01-30 09:32:45 CST, use 'shutdown -c' to cancel.
[root@pgyang1 etc]#
3)重启后两个结点看看情况
a.在pgyang2年可见到vip已经自动飘了过来:
[root@pgyang2 ~]# ifconfig -a
ens192: flags=4163<UP,BROADCAST,RUNNING,MULTICAST>  mtu 1500
        inet 10.10.40.100  netmask 255.255.255.0  broadcast 10.10.40.255
        inet6 fe80::250:56ff:fea4:1dca  prefixlen 64  scopeid 0x20<link>
        ether 00:50:56:a4:1d:ca  txqueuelen 1000  (Ethernet)
        RX packets 299271  bytes 154445246 (147.2 MiB)
        RX errors 0  dropped 54  overruns 0  frame 0
        TX packets 164159  bytes 26176386 (24.9 MiB)
        TX errors 0  dropped 0 overruns 0  carrier 0  collisions 0

ens192:0: flags=4163<UP,BROADCAST,RUNNING,MULTICAST>  mtu 1500
        inet 10.10.40.101  netmask 255.255.255.0  broadcast 10.10.40.255
        ether 00:50:56:a4:1d:ca  txqueuelen 1000  (Ethernet)
b.看一下pool_nodes的状态:
[postgres@pgyang1 ~]$ pyang
Password for user postgres:
psql (10.6)
Type "help" for help.

postgres=# show pool_nodes;
 node_id | hostname | port | status | lb_weight |  role   | select_cnt | load_balance_node | replication_delay
---------+----------+------+--------+-----------+---------+------------+-------------------+-------------------
 0       | pgyang1  | 5432 | down   | 0.500000  | standby | 0          | false             | 0
 1       | pgyang2  | 5432 | up     | 0.500000  | primary | 0          | true              | 0
(2 rows)

postgres=#
可见pgyang2上原来的从库已经提升成了主库
c.时间线已经由3又提升了一个,变成了4
[postgres@pgyang2 ~]$ pg_controldata|grep -i timeline
Latest checkpoint's TimeLineID:       4
Latest checkpoint's PrevTimeLineID:   4
Min recovery ending loc's timeline:   0
到此说明,在宕掉pgyang1这个主结点后,集群自动的完成了切换,实现了HA的功能!
4)修复pgyang1上的原来pg主库,使其变成新的从库,并加入集群。
a.vi一个recovery.conf文件
[postgres@pgyang1 10.6]$ mv  recovery.done  recovery.conf
[postgres@pgyang1 10.6]$
[postgres@pgyang1 10.6]$ cat recovery.conf |grep -v "^#"
restore_command = 'cp /pgdata/10.6/pg_archive/%f %p'
recovery_target_timeline = 'latest'
standby_mode = on
primary_conninfo = 'host=pgyang2 port=5432 user=replica password=replica'
trigger_file = '/pgdata/10.6/trigger_file'
b.尝试启动一下,看看
[postgres@pgyang1 10.6]$ pg_ctl start

看一下日志,循环在报如下的错,时间线的错
2019-01-30 09:48:50.675 CST,,,2650,,5c510282.a5a,1,,2019-01-30 09:48:50 CST,,0,FATAL,XX000,"could not start WAL streaming: ERROR:  requested starting point 0/B000000 on timeline 3 is not in this server's history
DETAIL:  This server's history forked from timeline 3 at 0/A025030.",,,,,,,,,""
2019-01-30 09:48:50.683 CST,,,2519,,5c510246.9d7,19,,2019-01-30 09:47:50 CST,1/0,0,LOG,00000,"new timeline 4 forked off current database system timeline 3 before current recovery point 0/B000098",,,,,,,,,""
2019-01-30 09:48:55.681 CST,,,2660,,5c510287.a64,1,,2019-01-30 09:48:55 CST,,0,FATAL,XX000,"could not start WAL streaming: ERROR:  requested starting point 0/B000000 on timeline 3 is not in this server's history
DETAIL:  This server's history forked from timeline 3 at 0/A025030.",,,,,,,,,""
2019-01-30 09:48:55.689 CST,,,2519,,5c510246.9d7,20,,2019-01-30 09:47:50 CST,1/0,0,LOG,00000,"new timeline 4 forked off current database system timeline 3 before current recovery point 0/B000098",,,,,,,,,"

把其停掉再:
[postgres@pgyang1 pg_log]$ pg_ctl stop
waiting for server to shut down.... done
server stopped
c.同步/修复数据时间线
加个-n参数,尝试一下,看能不能用pg_rewind修复
[postgres@pgyang1 pg_log]$ pg_rewind -n  --target-pgdata=$PGDATA --source-server='host=pgyang2 port=5432 user=postgres dbname=postgres password=ffff_888'
servers diverged at WAL location 0/A025030 on timeline 3
rewinding from last common checkpoint at 0/A024F88 on timeline 3
Done!
尝试成功,说明可以修复。
实施修复:
[postgres@pgyang1 pg_log]$ pg_rewind  --target-pgdata=$PGDATA --source-server='host=pgyang2 port=5432 user=postgres dbname=postgres password=ffff_888'
servers diverged at WAL location 0/A025030 on timeline 3
rewinding from last common checkpoint at 0/A024F88 on timeline 3
Done!
修复成功!
d.修改pg_hba.conf与 recovery.done文件
pg_rewind会同步主结点的这两个文件,把这两个文件改成pgyang1结点的。
e.再次启动pgyang1上的pg库
[postgres@pgyang1 10.6]$ pg_ctl start
[postgres@pgyang1 10.6]$
[postgres@pgyang1 10.6]$ cd pg_log
[postgres@pgyang1 pg_log]$ tail -f postgresql-2019-01-30_095937.csv
2019-01-30 09:59:37.999 CST,,,3362,,5c510509.d22,5,,2019-01-30 09:59:37 CST,1/0,0,LOG,00000,"redo starts at 0/A024F50",,,,,,,,,""
2019-01-30 09:59:38.006 CST,,,3369,,5c51050a.d29,1,,2019-01-30 09:59:38 CST,,0,LOG,00000,"started streaming WAL from primary at 0/A000000 on timeline 4",,,,,,,,,""
2019-01-30 09:59:38.010 CST,,,3362,,5c510509.d22,6,,2019-01-30 09:59:37 CST,1/0,0,LOG,00000,"consistent recovery state reached at 0/A05A170",,,,,,,,,""
2019-01-30 09:59:38.010 CST,,,3360,,5c510509.d20,2,,2019-01-30 09:59:37 CST,,0,LOG,00000,"database system is ready to accept read only connections",,,,,,,,,""
可见ok了!
f.把pgyang1上的pool启动,并查看一下pool_nodes
[postgres@pgyang1 ~]$ pgpool -n -d -D > /var/log/pgpool/pgpool.log 2>&1 &
[1] 3656
[postgres@pgyang1 ~]$ pyang
Password for user postgres:
psql (10.6)
Type "help" for help.

postgres=# show pool_nodes;
 node_id | hostname | port | status | lb_weight |  role   | select_cnt | load_balance_node | replication_delay
---------+----------+------+--------+-----------+---------+------------+-------------------+-------------------
 0       | pgyang1  | 5432 | down   | 0.500000  | standby | 0          | false             | 0
 1       | pgyang2  | 5432 | up     | 0.500000  | primary | 0          | true              | 0
(2 rows)

postgres=#
可见此时的pgyang1上的status状态不对,明明是up的,这里显示的确是down。
g.修复pgyang1上的pg库在pgpool中的状态,使其重新加入集群
#pgyang1的node_id是0,所以-n 0
[postgres@pgyang1 pg_log]$ pcp_attach_node -d -U postgres -h vip -p 9898 -n 0
Password:
DEBUG: recv: tos="m", len=8
DEBUG: recv: tos="r", len=21
DEBUG: send: tos="C", len=6
DEBUG: recv: tos="c", len=20
pcp_attach_node -- Command Successful
DEBUG: send: tos="X", len=4
[postgres@pgyang1 pg_log]$

再看一下pool_nodes
[postgres@pgyang1 pg_log]$ pyang
Password for user postgres:
psql (10.6)
Type "help" for help.

postgres=# show pool_nodes;
 node_id | hostname | port | status | lb_weight |  role   | select_cnt | load_balance_node | replication_delay
---------+----------+------+--------+-----------+---------+------------+-------------------+-------------------
 0       | pgyang1  | 5432 | up     | 0.500000  | standby | 0          | false             | 0
 1       | pgyang2  | 5432 | up     | 0.500000  | primary | 0          | true              | 0
(2 rows)

postgres=#
至此,整体实践全部完成了!
近期评论